Showing posts with label Hacking. Show all posts

Friday, August 5, 2016

Payoneer Review – A Guide to Create Account & Receive Money:

Payoneer Review – A Guide to Create Account & Receive Money:


If you are a small business, freelancer, consultant or any professional who receive money from all over the world then Payneer can be a good option for you.

Well I have been working as a freelancer online for 10 years now. In this line of work you don’t need to see your employer face to face because you work from home.

So for payments they pay you online through wire transfer.

Every freelancing job involves online payment. My first online payment company was through PayPal.

But the deductibles were very high so I started looking for other online payment services.

I found out Payoneer, another popular online payment company.

Sign Up & Earn $25*

Payoneer Review:


After using it for 2 years now I found out both PayPal and Payoneer have advantages as well as disadvantages in them.

So I decided to write an article putting Payoneer in the spotlight and comparing it with PayPal.
Let us see.

Main dashboard_blog

How Does Payoneer Work?


Payoneer works just like PayPal or any other online payment company.

You go to the Payoneer website, sign up there (we discuss in next paragraph) and create an account.

Once you have created your account with Payoneer you can send Payoneer identification account number and routing number to the company that needs to pay you.

For example right now I am working as a freelancer with Elance, I will give my Payoneer account detail to Upwork and all my due payments will be sent to my account.

So Payoneer is a bridge between you and your employer. Here is the list of some services you can use with Payoneer.


  •     Amazon.com
  •     99Designs
  •     Airbnb
  •     Elance
  •     Getty Images
  •     Clickbank
  •     People Per Hour
  •     CPA Lead
  •     eBay
  •     Upwork Corporation and more than 2000 companies.


How to Create Account and Receive Money


Creating account with Payoneer is very simple. Visit this Payoneer Signup Page & click on Signup. You will also receive a signup bonus of $25.

You can join as an Individual or a company. If you are a professional without any registered company then choose Individual.

Payoneer Signup


There are 4 steps to signup-


  •     Getting Started: Enter your name, email & date of birth
  •     Contact details: Write your address & phone number
  •     Details: Enter account password & choose security question & answer
  •     Almost Done: Enter bank details, check the TnC check box & click on Submit.


Sign Up & Earn $25*


Fill up the information correctly and you are done.

Then your application goes for the review process and after weeks they send you email confirmation.

Once your account has been created you login and send a payment request to the company you wanted to withdraw your money from.

While requesting payment you have to keep few things in mind.


  •     The Amount you want to withdraw
  •     Payment Types – It means the party you are going to receive your payment from. You have to             Choose one from the dropdown menu. Mine was Elance.
  •     Payer Details – Fill the details about the payer in my case it was again Elance.


Click Pay Now and you will be paid through the Payoneer right in your back account.

Payoneer Master Card


Payoneer Master Card In last paragraph we saw transferring money to your local bank account. You can also activate your prepaid master card.

You can use the card at ATMs to withdraw cash.

You can load money using Visa or MasterCard to your card. However there is a daily cash withdrawal and purchase limits.

Payoneer Fee Structure


For every transaction Payoneer is going to deduct money just like PayPal or any other wire transfer service.

Although fees keep changing but we are giving you latest figures that were available the day we wrote the article.

There are three ways you can withdraw your money through Payoneer.


  •     Payoneer MasterCard
  •     ATM Withdrawals
  •     Direct Bank Transfer


For each of them Payoneer charges a fee whenever you make a transaction.

Payoneer MasterCard


    $5 for Card Activation in US and $10 outside US.
    For Loading Payment (Standard Edition) it is $1.5 and for Immediate it is $4 each time payment is loaded.
    $3 for monthly card account maintenance
    For Card Replacement in US it is $12.95


ATM Withdrawals


    ATM Withdrawal for Per Transaction in US is $1.35 and outside US $2.15.
    ATM Decline fee is $.90
    Inquiry fee is also $.90

Direct Bank Transfer


This is the most popular way for transactions among users. For every bank transfer the Payoneer is going to charge $2 for every $100 you transfer.

So for example if you want to transfer $1000 then you have to pay $20 in transaction fee and you receive only $980.

For less than $75 it may charge $3 per transaction.


Sign Up & Earn $25*


Payoneer Vs PayPal


Payoneer Vs PayPal It has been said that Payoneer could be a replacement for PayPal. Those of you don’t like using PapPal because of transactional fees can go for Payoneer.

So let us do small comparison between Payoneer and its competitor PayPal.

When it comes to global transaction that means people living outside US then Payoneer is better than PayPal.

Transactional Fees


For every transaction of $100 in India you can save up to $3 using Payoneer. PayPal would charge $5 every transaction (Plus extra charges) on the other hand Payoneer will deduct only $2 (if amount is over $75).
Smooth Transaction

Unlike PayPal, in Payoneer there is no manual work required like initiation. PayPal takes 2 to 4 business days for transferring money to your account however Payoneer takes only 24 hours.

So Payoneer is smoother than PayPal.

Daily Withdrawal Amount


Moreover daily withdrawal amount is also higher for Payoneer compared with PayPal. In Payoneer you can withdraw up to $5000 every day.
Extra $25 Bonus for Indian

Moreover Payoneer India is offering extra $25 bonus for every sign up. So these are advantages of Payoneer over PayPal.

Disadvantages of Payoneer


However a review is not complete unless I give you other side of the picture. Sometimes it happens that Payoneer withholds your funds and does not pay on time.

Their customer service is also not good if you are living outside US.

So these can be few issues with using Payoneer.
Which one to Choose?

Finally I would suggest you to use both of them. If you trust PayPal then continue with it.

However you want to save money then Payoneer can be a better choice.


Main dashboard_blog

Monday, August 1, 2016

Download Hike for PC Laptop Windows 7/8/8.1/10

Download Hike for PC Laptop Windows 7/8/8.1/10


Hike is a messaging app developed by Indians. It’s one of the biggest competitor of the world’s leading social messaging app called WhatsApp. There are many similarities between WhatsApp and Hike. But, Hike has its own unique features. From some point of view hike is better than WhatsApp. You feel the difference after using Hike for some time.

Anyhow, you may already have a great experience of using hike on your smartphone, but now you can use it on your computer too. So, here is this post I have written about Hike Download for PC. Here you will find the download link and how to guide hike for PC guide. So, start reading the post below.
downlaod hike for pc

Download Hike for PC Laptop Windows 7/8/8.1/10

As you guys know hike is a social messaging app developed for smartphone so, it’s a bit hard to install it on computers. But, don’t worry, it is not impossible. However, you do need to follow some steps to download and install hike for PC. There are many methods for doing this. But, 3 of them are really easy to use and you can easily apply them.

Download Hike for PC using BlueStacks android Emulator

This is the easiest method for downloading and installing hike on PC. In this method we will use something called android emulator. An android emulator is a piece of software which can help you to run android games and application on your computer. There are many android emulators available on the web, but, for this method we will use BlueStacks.
BlueStacks is the most popular android emulator software, and one of the biggest reason behind its popularity is it’s free to use. Just follow the steps below to find out how to download hike for pc using BlueStacks android emulator.
• First download BlueStacks from the link given below and install it on your computer. I think you already don’t have it, in case you already have it installed move to the next step.
  • After BlueStacks is installed on your computer you need to open it. Now in the top left side of BlueStacks window you will a search icon just click on that and search for Hike.
downlaod hike for pc using bluestcaks image 1
• After that click on Search for Hike on Google Play. Now the Google play (Hike page) will open in BlueStacks.
• You may need to log in to your Google account, log in and after that click on Install Button to download and install Hike Messenger on your computer.
downlaod hike for pc using bluestcaks image 2
Now depending on your internet speed BlueStacks will download and install Hike on your computer. If you like this method, then use it otherwise you can check 2 other methods below.

Method 2: Download Hike for PC using APK file (using Online Google Play Downloader)

In this second method we will again use BlueStacks Android emulator. But, this time we will not download hike from the Google play on BlueStacks, here we will download the Hike Apk (Android Application file format) manually and then install it on the computer.
As here we will use the same software, so you need to download and install BlueStacks on your computer before you follow the steps below. You can download BlueStacks from the link that I have given above. After you install BlueStacks follow the step below.
• First Go to Google Play and Search for Hike
• Now copy the Page URL, or alternatively you can copy the Google play Hike page URL from below.

• Now Open Online APK Downloader, you will see a box just paste the copied URL on that box and click on Generate download URL Button.
download hike hike apk for pc image
• Within seconds you will see a green button will appear click on that button to download Hike Apk.
Once you download Hike Apk just click twice on the downloaded file and it will be installed on your computer. However, you can check the third method below.

Method 3: Download Hike for PC using YouWave

You can try this third method if you don’t want to use any of the above methods. Don’t worry, only because I have listed last, doesn’t mean that it’s a hard method. This is also an easy method. We will again use an Android Emulator here, but this time we will use YouWave instead of BlueStacks.
Actually, Sometimes BlueStacks gives a lot of errors when you try to install on your computer. But, YouWave can get installed on pretty much any computer. So, you can use this method if you are using an old PC. Follow the guide below.
  • First download and install YouWave from the download link below.
  • Download YouWave
  • Now Open YouWave, you can click on the YouWave icon on your desktop. You will see the YouWave Window.
  • There will be a menu just like the menu you see on Android Smartphone and Tablets. Click on the Browser icon to open browser, go to Google play and Search for Hike.
download hike using YouWave image 1
• Now Sign in to your Google Account and after that click on install button to download and install Hike on your computer.
download hike using YouWave image 2


Now enjoy chatting on Hike, hope soon you will be using Hike from your computer. Have a great day!


12 Best Ways to Access Blocked WebSites in Schools/Colleges/Office

12 Best Ways to Access Blocked WebSites in Schools/Colleges/Office

In many schools and workplaces, the administration is likely to block numerous interpersonal communication and other sites because of different reasons. Indeed, even our most popular and loved destinations like FACEBOOK, TWITTER, GMAIL, MYSPACE, HI5, and FRIENDSTER are getting obstructed nowadays. Social networking sites which are normally very vibrant in places of work and school have specifically been targeted because of the popular cry that they waste a lot of time.This article will inform you of some conceivable approach on how to access blocked sites in school/office.

access blocked sites

1. Use of Proxy websites to get to blocked sites.

Instead of straightforwardly uniting with the sites that are hindered at your place, you will first associate with a Proxy server which will divert to the blocked site and you can get to them effectively. The proxy literally acts as an intermediary.There are numerous intermediary sites accessible on web, I can give you a gigantic rundown of them. Be that as it may, these are some of the most broadly utilized online intermediaries.
  • http://www.hidemyass.com
  • http://www.spysurfing.com
  • http://kproxy.com/index.jsp
  • http://proxify.com/
  • http://www.proxymouse.com

  • 2. Use Tor Browser to surf .
You can only get to static websites if you utilize the above system and not dynamic websites such as Facebook, twitter, MYSPACE… and so on in light of the fact that social networking destinations utilizes programs to store cookies. It can not be achieved when using these Proxy sites. To use Tor,you will have first have to download it https://www.torproject.org/download/download into your computer.From the website,you will be able to figure out how its used.

3. Hola Browser extension to unblock sites.

Hola is a Browser extension accessible in every well known program used to surf the internet, by utilizing this extension ,you can scan on web secretly. Simply check the official site of http://hola.org and introduce the browser extension into your computer from that point. 

4. USE PROXY IP ADDRESS IN PROGRAM SETTINGS.

Few of the browsers allow use of the PROXY IP address in them. To use this method,you require Mozilla fire fox web browser and a Proxy IP address. In your Mozilla Firefox program open the OPTIONS box and click on ADVANCED. Beneath the CONNECTIONS select SETTINGS. Click on MANUAL PROXY SETTINGS and enter the PROXY IP address. The proxy Ip address will help you browse remotely.

5. Access Blocked sites by Using Wayback Machine.

Wayback Machine is a way which we can access the previous Look of any site from its files. Enter the URL of the blocked site and you can even get to the past forms of the site that are obstructed at your Place.

6. Use IP address rather than domain name

Offices and schools block sites by utilizing some software’s where they enter URL’s of the Websites they have to square out.That makes it impossible for any user to access any website that has been listed in this software’s. However,you can access this websites if you enter the IP address of the websites.
  1. To find the IP address of the website just open your command prompt on your Windows PC by pressing WIN+R > type CMD > hit ENTER. Now in the Command prompt just enter the following code.
  2. Ping website.com (enter the blocked website in the place of website.com).
  3. Now enter that IP address on your browser and you can access the BLOCKED websites.

7. Open Blocked locales utilizing decimal code.

By utilizing the decimal numbers you can get to any blocked sites, in light of the fact that none will even block the IP address in decimal. To get the decimal code of IP location utilizing http://www.allredroster.com/iptodec.htm.
For instance IP location of google is http://74.125.236.160/you can utilize the decimal organization rather HTTP://1249766560

8. Take help of Google store

Google stores the cache of every last site or regularly visited site. You can get to the reserve of any site utilizing googles old CACHE. Simply hunt down the BLOCKED site which you need to open and click on the CACHE link below the search results.

9. Utilizing Translation web administrations

There are numerous sites on GOOGLE – TRANSLATE and BING – TRANSLATE l which will change over the entire page starting with one language then onto the next. Enter the URL of the blocked site in those web page and convert the page into another language. From this you can change over the entire page into another language and can get to it.

10. Scanning on HTTPS association

HTTPS is protocol for secure communication over a computer where information will be encoded. This trap will work in numerous universities and schools (This trap even worked in my Collage). Rather than utilizing HTTP use HTTPS and attempt to get to the site. Try to visit http://www.google.com then attempt https://www.google.com and attempt to get to the site.

11. Open blocked sites Using URL shorteners

Typically URL shorteners are utilized to abbreviate the length of the long sites. By utilizing such locales you can sidestep the security and access the sites. Take a stab at utilizing http://tinyurl.com and http://www.moourl.com

12. Get an email of the website page utilizing web2mail

http://www.web2mail.com/lite/welcome.php is a free website which will let you acess the mail of any website page that you asked. Check the site for more subtle elements. You can get any blocked site as mail to you and then access them VIA your email.

13. Use VPN programming’s and Unblock sites

VPN programming’s will let you browse remotely, you simply need to download and introduce them on your PC. There are both paid and free VPN programming’s accessible. Here are the best three VPN programming’s that will permit you to blocked sites.
  1. HotspotShield VPN
  2. TunnelBear Vpn
  3. ProX
Regardless of where you are, at school, at school, at home, or at office or whatever other system, web filtering is imperative in the matter of hindering certain sites and some web content . There are numerous advantages of using software filters.But incase you need some of the blocked sites,those are some of the ways on how to access blocked sites in school/office.

Aurora SVG Viewer & Converter

Aurora SVG Viewer & Converter

The advent of HTML5 has brought greater usage of SVG-formatted vector images. If you’re a web developer, now’s the perfect time to get ahead of the game and outfit your workflow with everything that you need to work with HTML5 and SVG images. The first step is to grab a copy of today’s discounted software promotion, Aurora SVG Viewer & Converter, available for Mac and Windows users!
Aurora SVG Viewer & Converter makes it easy to organize, view, and convert SVG images. With Aurora SVG Viewer & Converter, you’ll enjoy a convenient thumbnail display mode, and an instantly recognizable folder view. If you need to convert an SVG image to a different format, Aurora SVG Viewer & Converter saves the day by enabling you to save images as TIFF, PNG, JPB, BMP, GIF, TGA, XPM, PPM, XBM, or even PDF format files. Even better, you can convert multiple files in batch!
Of course, you always have full control over the details with Aurora SVG Viewer & Converter. Adjust output resolution, convert portions of SVG images, and set conversion quality!

svg converter windows


Aurora SVG Viewer & Converter Features:


1. Support Windows & MAC OS.

2. Easy folder selection and thumbnail display mode.
6. Output resolution is easily set with the free zoom resolution. Select and convert any area of the SVG canvas.

7. Custom convert any area you choose: select an area of the SVG image and convert.

8. Quick set of the conversion quality.

9. Use your preferred Windows or Mac OS to quickly preview SVG or animations, and batch convert SVG to several image formats. Go ahead, give it a try!


DesignBox | Best Assistant for Graphic & Picture Design | MAC & Windows

DesignBox – Image Effects

DesignBox | Best Assistant for Graphic & Picture Design | MAC & WindowsEasily adapt your pictures to the best popular styles, such as Fashion, LOMO, Digital Studio Effects, etc.

Do you enjoy designing stylish and elegant men or beautiful girls? You may be a photographer, so you owe it to yourself to try this software tool.

With a single click you’ll have at your disposal hundreds of picture styles, dozens of filters, be able adjust the lightness, contrast, saturation, sharpness, HUE and RGB colors of your work!


Give it a try, make your pictures a work of art with all our amazing effects. Aurora3D Software


image effect function 1 thumb

Basic Image Adjust

  • Make use of Lightness, Contrast, Saturation and Sharpness effects to compose and arrange your pictures just the way you want them.
effect_func2_thumb

Hue and Color Adjust

  • Use the slide bar to adjust the HUE and the RGB color of your pictures. Build your images to give them a warm or cold effect, and adjust their colors if needed.

Filters

  • You can apply and use dozens of filters, including Blur, Soften, Gaussian Blur, Sharpen, Edge, Emboss, Erode, Contour, Jitter, Flip, Mirror, Negative and Gray Scale.

Quick Style Templates

  • Pick and choose from hundreds of picture style templates. Additionally, you have access to basic effects, lomo and fashion style, and other digital studio effects. You’ll be amazed at your options!

DesignBox – Painter

With the painter tools, easily and freely draw your cartoon shapes and designs.
To draw shapes, just use pencil, brush, or spray freely. The line, rectangle and circle tools will help you create regular shapes, and with the crop, eraser, color picker, paint pail you will be able to make needed changes easily.
What about if you want to use Text? No problem, go ahead and use the Text button to change the font, make it bold, italic or both.

DesignBox – Image Convert

Using the batch mode, easily adjust the size of your images, rotate them, add a watermark, or rename and export them.
Importantly, to batch convert all your images with a single click, you can batch convert them by selecting the multiple or all options.
Your images can be exported in several formats: JPG, PNG, BMP, TIF, TIFF, TGA, XPM, XBM, and PPM.


DesignBox – Image Effects

Easily adapt your pictures to the best popular styles, such as Fashion, LOMO, Digital Studio Effects, etc.

Do you enjoy designing stylish and elegant men or beautiful girls? You may be a photographer, so you owe it to yourself to try this software tool.

With a single click you’ll have at your disposal hundreds of picture styles, dozens of filters, be able adjust the lightness, contrast, saturation, sharpness, HUE and RGB colors of your work!

Give it a try, make your pictures a work of art with all our amazing effects. Aurora3D Software


image effect function 1 thumb

Basic Image Adjust

  • Make use of Lightness, Contrast, Saturation and Sharpness effects to compose and arrange your pictures just the way you want them.
effect_func2_thumb

Hue and Color Adjust

  • Use the slide bar to adjust the HUE and the RGB color of your pictures. Build your images to give them a warm or cold effect, and adjust their colors if needed.

Filters

  • You can apply and use dozens of filters, including Blur, Soften, Gaussian Blur, Sharpen, Edge, Emboss, Erode, Contour, Jitter, Flip, Mirror, Negative and Gray Scale.

Quick Style Templates

  • Pick and choose from hundreds of picture style templates. Additionally, you have access to basic effects, lomo and fashion style, and other digital studio effects. You’ll be amazed at your options!
———————————————————————————————————————————————————————————————————————

DesignBox – Painter

With the painter tools, easily and freely draw your cartoon shapes and designs.
To draw shapes, just use pencil, brush, or spray freely. The line, rectangle and circle tools will help you create regular shapes, and with the crop, eraser, color picker, paint pail you will be able to make needed changes easily.
What about if you want to use Text? No problem, go ahead and use the Text button to change the font, make it bold, italic or both.

paint function 1 thumb

Painter Tool Box

  • So that your designs follow your goals, the Tool Box offers you many options, including Pencil, Line, Text, Rectangle, Circle, Paint Pail, Brush, Spray, Crop, Eraser, Color Picker, and Select.
paint_func2_thumb

Rotate and Flip

  • You can rotate your images 90°CW, 90°CCW, or 180° and then flip your images vertically or horizontally.
paint_func3_thumb

Copy and Cut Selected Area

  • Select any area on the canvas, and then copy or cut it. Paste any images held in your window’s clipboard.
paint_func4_thumb.jpg

Quick Color Settings

  • Foreground and background colors are easily set, or if you need to, select the color bar or click the Edit button to choose additional colors from the color library.
———————————————————————————————————————————————————————————————————————

DesignBox – Image Convert

Using the batch mode, easily adjust the size of your images, rotate them, add a watermark, or rename and export them.
Importantly, to batch convert all your images with a single click, you can batch convert them by selecting the multiple or all options.
Your images can be exported in several formats: JPG, PNG, BMP, TIF, TIFF, TGA, XPM, XBM, and PPM.

Batch Convert

  • Choose several pictures or add a folder to rotate them, change their size, add watermarks, or rename and convert them to many image formats.

Rotate

  • Rotate your images 180° 90°CW and 90°CCW, and then choose to rotate them vertically or horizontally.

Resize

  • Resize and crop are at your disposal. Aspect ratio can be maintained; you can change your image size, or crop an image from any area on your picture.

Watermark

  • Select you text or image to watermark. Set the font and color of the text, or select an image to mix it. Watermark position, rotation angle and transparency can also be set.

Rename

  • Use this format: “newname####” and set the start number. Use the batch mode to change file names in any sequence.

Convert to many Formats

  • Export your image in the original format or select JPG, PNG, BMP, TIF, TIFF, TGA, XPM, XBM, or PPM. Set the quality and save to your location.


DesignBox – GIF Maker

Easily create GIF animations with any set of pictures.
Add your image sequence in a list, set the GIF width, height, image delay and then export it.
The ability to create GIF animations with or without background is very satisfying and rewarding.
GIF Maker allows you to remove or add background color.


Saturday, July 30, 2016

How To Install Wine Software In Ubunthu or Linux


How To Install Hitleap Viewer in Ubunthu or Linux


How to Upload Videos in Youtube and Earn Money


How To Find Saved WI-FI Password in Any one's Computer


Configure static IP address on Ubuntu 16.04 LTS Server


Configure static IP address on Ubuntu 16.04 LTS Server


Ubuntu 16.04 has been out for just over a month now, and I’m in the process of upgrading some boxen. In some cases I’ve been completely reinstalling them for that clean fresh feel, and find myself once again having to configure static IP addresses.
Doing this can be problematic (made worse by the fact that even the official Ubuntu LTS documentation doesn’t give correct advice), particularly when it comes to DNS resolution, and in my case, a very-old-school habit of blindly wanting to edit the /etc/resolv.conf file which you really should not be doing any more these days.

Step 1. Edit the /network/interfaces file

sudo nano /etc/network/interfaces
sudo nano /etc/network/interfaces
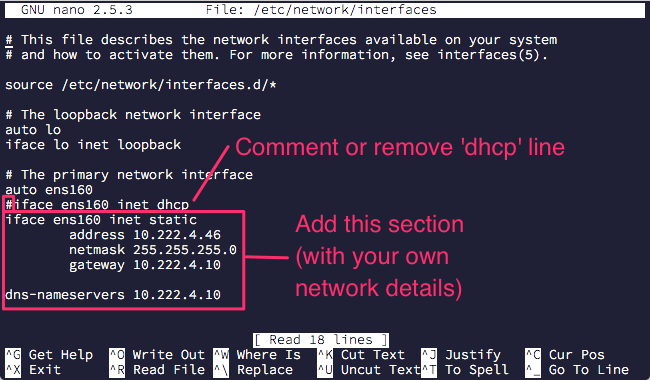
The interfaces file is where you need to change from the default “dhcp” setting to add some information about the “static” IP address that you want to configure.
In this case, look for the line in the file that says “# The primary network interface” and directly beneath this you’ll see something like (the default DHCP configuration):
auto ens160
iface ens160 inet dhcp
If you’ve been using previous versions of Ubuntu you might have noticed that the interface name above “ens160” looks a bit odd. It used to be called “eth0” or “eth1”, but as from Ubuntu 15.10 the interface name is now allocated based on a few other factors – read more about that here if you’re interested.
Simply comment, remove or edit the line that says ends with “dhcp” and add the following information (here’s an example only):
iface <interface> inet static
 address 192.168.0.100
 netmask 255.255.255.0
 gateway 192.168.0.1
Next you’ll want to add the nameservers by adding the line “dns-nameservers” followed by a list of IP addresses.  A lot of people use Google’s public DNS, or if you have details from your service provide use them instead.
dns-nameservers 8.8.8.8 8.8.4.4
PRO-TIP: Double-check the file again, and ensure all details are correct, before proceeding.  If you are configuring a remote system you could easily cut yourself off if you get it wrong.
Save the file, and you’re done.

Step 2. Restart the networking service (or reboot)

Once you are confident the change has been made, and if you don’t want to reboot you can just restart the networking service.
sudo /etc/init.d/networking restart
After doing this, and provided you don’t get any errors, your primary network interface should now be configured with the static IP address details you have provided.
Failing that, a reboot will also do the trick quite nicely, and with the current version of 16.04 I suspect there’s a bug that is causing “ifconfig -a” not to update unless you perform a reset.
sudo reboot
Good luck, and may your boxen be correctly addressed.

Friday, May 20, 2016

"how to hack secured with WPA,WPA2 encreptions Wifi Password" Using "CMD"

How to Hack Wifi password using cmd

Hi Friends,

Today  I am Going to show You,
"how to hack secured with WPA,WPA2 encreptions
Wifi Password" Using "CMD"

Hello Friends, In this article we will share some tricks that can help you to hack wifi password using cmd. You can experiment these trick with your neighbors or friends. It's not necessarily that this trick will work with every wifi because of upgraded hardware. But you can still try this crack with wifi having old&new modems or routers.


1: WEP: Wired Equivalent Privacy (WEP) is one of the widely used security key in wifi devices. It is also the oldest and most popular key and was added in 1999. WEP uses 128 bit and 256-bit encryption. With the help of this tutorial, you can easily get into 128-bit encryption and Hack WiFi password using CMD.


2: WPA and WPA2: Wi-Fi Protected Access is an another version of WiFi encryption and was first used in 2003. It uses the 256-bit encryption model and is tough to hack. WPA2 is an updated version of WPA and was introduced in 2006. Since then it has replaced WPA and is now been used mostly in offices and colleges worldwide.

So Let's Do it.

Steps to Hack Wifi password using cmd:

Step 1:Goto command prompt(admin)
Then Type
Step 2: netsh wlan show profile
and hit enter
IT SHOW AVAILABLE NETWORKS
then type
Step 3:netsh wlan show profile name of the profile key=clear
and hit enter
After see this list of networks and see the password is in Security settings Group
                                           Key content


Check Also,
Top-8-best-url-shortener-to-earn-money
how-to-make-money-with-studybay
Malwarebytes-anti-malware

Tor Encryption Tool for Free Download

Tor Encryption Tool for Free Download


Tor is a well-known browser and is used by many security experts. This Browser provides anonymous communication among users. It can hide the network IP of a user hence, he/she can browse the web anonymously.


This tool is compatible with Windows and Linux systems and requires minimum hardware requirements. To Download Tor Encryption Tool, just click the download button given below.